You took the first step — buying technology. Now all you have to do
is master it. We’re here to help, with tips and tricks you may have
missed. If you know them already — well done, guru! If not, there’s no
better time to start learning than right now.
Skill Level: Beginner
Private Browsing lets
you surf without adding any pages to your History list, searches to
your Google search suggestions, passwords to Safari’s saved password
list, or autofill entries to Safari’s memory. You might want to turn on
Private Browsing before you start visiting websites that would, you
know, raise interesting questions with your spouse, parents, or boss.
Until iOS 7 came along, you had
to dig three screens deep in Settings to turn Private Browsing on or off
— a detour to a totally different app.

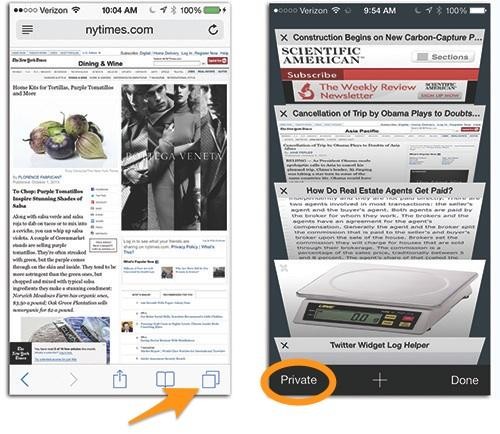
Not anymore. Now, when you want to stop leaving tracks, tap the Multiple Tabs button to open your browser tabs screen; tap Private at the bottom-left corner. A duplicate Private button awaits when you tap the Bookmarks button.
(When you tap Private, Safari may ask you what to do about pages you already have open. You can Close All or Keep All. If you choose Keep All, those pages remain open; only the new pages you visit won’t be remembered.)
From now on, Safari records nothing while you surf.
When you’re ready to browse
“publicly” again, turn Private Browsing off once more. Safari resumes
taking note of the pages you visit — but it never remembers the ones you
opened while in Private.
In other words, what happens in Private Browsing stays in Private Browsing.
No comments:
Post a Comment