Sunday, 20 July 2014
Friends of Technology: Top 10 Best Free Messaging Apps for Android, iPhon...
Friends of Technology: Top 10 Best Free Messaging Apps for Android, iPhon...: Text messaging, or texting, is the act of typing and sending a brief, electronic message between two or more mobile phones or fix...
Top 10 Best Free Messaging Apps for Android, iPhone and Windows
Text messaging, or texting, is the act of typing and sending a brief,
electronic message between two or more mobile phones or fixed or
portable devices over a phone network. The term originally referred to
messages sent using the Short Message Service (SMS); it has grown to
include messages containing image, video, and sound content (known as
MMS messages). Below are the top 10 apps for Android, iPhone and Windows
operating system.

1. Nimbuzz
This app is packed full of features, and if they only made it a little more sophisticated then it would be a world beater. It is able to make video calls and voice calls. It also gives you access to chat rooms and has IM functions too. You can play games on it and you can buy credits to call land lines, although why you would do this when you have a mobile phone in your hands is a mystery, but the option is still there if you need it.
2. Rounds
This is a video calling app that you can use with your iOS or Android, and it allows for real-time messaging. It allows for interactive activities including video chatting, text messaging, interactive game play and interactive video watching. It offers a different video chatting experience by adding more interactive features than most do, which makes it a good personal use video chatting and messaging app.
3. Google Hangouts
The text function on this app has replaced Google Talk, even though the text function is a little basic. You may make free conference calls on this by having numerous people within your video or audio call. And, you may do most of their functions for free.
4. Voxer
The fact that this app applies so much dedication to voice messaging is one of the main reasons why it is not just viewed as yet another chatting app. It allows you to play back voice messages that you have received, even though the voice chatting functions are all streamed live.
5. Skype
This is the most popular chatting app on the list. It has a strong interface, and is known quite widely. This is good because it means more people are likely to have Skype and so are able to talk to you on it. You may use simply the voice function, or you may use the video calling function too. It is also available on most platforms including on desktop platforms, plus as a communication client, it is pretty reliable.
6. iMessage and FaceTime
Both of these apps make up a complete service. The two are supposed to form one big app, but nobody has seen fit to meld them yet, even though they have 250 million users and 2 billion messages are sent per day. The sheer numbers of this Apple-only app are enough to convince most people that the app is worth a try.
7. Snapchat
This is a popular messaging app that Facebook soon released its own version of. Its best feature is how quickly it allows a user to share photos as well as messages. From start to finish it takes less than ten seconds to get one image from one phone to another. Photos and messages may also be presented as stories which do not expire in the same way that regular messaged images often do.
8. Viber
This was created from the ground up as a mobile app, which means it is better suited to most mobile phones. This is great for video chats and it very reliable too. It is stripped to basics when it comes to IM functions, but it is not really to the apps detriment. They have also started offering a premium service too, and have created a desktop app too so that people may communicate between mobile phones and desktop computers.
9. BBM
There is an Apple-only app on this list; it seems only fair that there is a Blackberry-Only app. however, this year it was also launched on the Android and iOS too. It is a basic app but is very popular with Blackberry users, and has some pleasingly simple and basic voice and video calling functions, along with some nice IM functions too.
10. ChatON
This fun little app is full of weird but original ideas and features. It is not the easiest app to control or use, but it is by no means difficult to understand, use or learn to use. It even has a translation service that allows you to chat (text-chat) with other people who are not using the same language as you. This app was developed by the technology company Samsung.
Top 10 Best Free Messaging or SMS Apps for Android, iPhone and Windows
1. Nimbuzz
This app is packed full of features, and if they only made it a little more sophisticated then it would be a world beater. It is able to make video calls and voice calls. It also gives you access to chat rooms and has IM functions too. You can play games on it and you can buy credits to call land lines, although why you would do this when you have a mobile phone in your hands is a mystery, but the option is still there if you need it.
2. Rounds
This is a video calling app that you can use with your iOS or Android, and it allows for real-time messaging. It allows for interactive activities including video chatting, text messaging, interactive game play and interactive video watching. It offers a different video chatting experience by adding more interactive features than most do, which makes it a good personal use video chatting and messaging app.
3. Google Hangouts
The text function on this app has replaced Google Talk, even though the text function is a little basic. You may make free conference calls on this by having numerous people within your video or audio call. And, you may do most of their functions for free.
4. Voxer
The fact that this app applies so much dedication to voice messaging is one of the main reasons why it is not just viewed as yet another chatting app. It allows you to play back voice messages that you have received, even though the voice chatting functions are all streamed live.
5. Skype
This is the most popular chatting app on the list. It has a strong interface, and is known quite widely. This is good because it means more people are likely to have Skype and so are able to talk to you on it. You may use simply the voice function, or you may use the video calling function too. It is also available on most platforms including on desktop platforms, plus as a communication client, it is pretty reliable.
6. iMessage and FaceTime
Both of these apps make up a complete service. The two are supposed to form one big app, but nobody has seen fit to meld them yet, even though they have 250 million users and 2 billion messages are sent per day. The sheer numbers of this Apple-only app are enough to convince most people that the app is worth a try.
7. Snapchat
This is a popular messaging app that Facebook soon released its own version of. Its best feature is how quickly it allows a user to share photos as well as messages. From start to finish it takes less than ten seconds to get one image from one phone to another. Photos and messages may also be presented as stories which do not expire in the same way that regular messaged images often do.
8. Viber
This was created from the ground up as a mobile app, which means it is better suited to most mobile phones. This is great for video chats and it very reliable too. It is stripped to basics when it comes to IM functions, but it is not really to the apps detriment. They have also started offering a premium service too, and have created a desktop app too so that people may communicate between mobile phones and desktop computers.
9. BBM
There is an Apple-only app on this list; it seems only fair that there is a Blackberry-Only app. however, this year it was also launched on the Android and iOS too. It is a basic app but is very popular with Blackberry users, and has some pleasingly simple and basic voice and video calling functions, along with some nice IM functions too.
10. ChatON
This fun little app is full of weird but original ideas and features. It is not the easiest app to control or use, but it is by no means difficult to understand, use or learn to use. It even has a translation service that allows you to chat (text-chat) with other people who are not using the same language as you. This app was developed by the technology company Samsung.
Saturday, 19 July 2014
Friends of Technology: Friends of Technology: List of RUN commands
Friends of Technology: Friends of Technology: List of RUN commands: Friends of Technology: List of RUN commands : Run command is the executable name for a particular program. In other words, a run command is...
Hide last name on Facebook [Working in 2014]
You might see that some users have only first name as their name on
Facebook timeline and even you tried to do that but Facebook doesn't
allow to show your first name as whole name unless and util you are an
Indonesian user. So how to show to Facebook system that you are an
Indonesian user even though you are not? You may think of using
Indonesian proxy, VPNs? Yes, you are bit close to the trick but now
Facebook have patched their loophole to disallow other users to pretend
as Indonesian user to set first name as complete name. Still as said
like nothing is impossible, their is a way to bypass their system. So
follow the steps to hide your last name on Facebook.
How to hide last name on Facebook?

Steps you have to perform
1. Log in to your Facebook account.2. Navigate to "Account Settings" page.


5. Copy down proxy and it's port. Make sure the proxy have medium level speed and its of "Transparent"anonymity.

I have already a proxy in my browser! What should I do?
Don't worry, I have solution for this too. You need to register here and download the VPN software "PD- Proxy". Remember your username and password, you need to enter the credential into software.Note: Normal users who don't have proxy in browser should skip these steps! Continue with step 7.
- After downloading their software, extract it and open "PD-Proxy.exe". Wait until it installs network drivers.
- Fill your username and password in main window.
- Switch to settings tab. Click on "Show advance settings".
- Switch to "Parent proxy" section. Enter the proxy and port that your browser currently have. Click on "Save & go back". Make sure you have selected "Server and protocol" as "Demo server" and "TCP". Click on connect. You should get successful connected message.

- Remove proxy port from browser. Now follow below steps normally.
7. Select Tools -> Options -> Select "Advanced" tab -> Network -> Tick on "Manual proxy configuration" , write down your proxy and port address and tick on "Use this proxy for all protocols" -> Click on save.
Note: Do not use the proxy shown in screenshot, It may get dead. Always use fresh proxies.

8. It's time to hide your last name. Because we have changed the language to Indonesia, follow my screenshots to do necessary steps. Click on "Sunting" in front of "Nama". Fill your first name and clear all other fields. Enter your password and hit enter.

10. Revert back the proxy settings to default one. Change language back to "English (US)" or your one's.

Friday, 18 July 2014
Friends of Technology: List of RUN commands
Friends of Technology: List of RUN commands: Run command is the executable name for a particular program. In other words, a run command is the name of the actual file that star...
List of RUN commands
Run command is the executable name for a particular program. In other
words, a run command is the name of the actual file that starts an
application.
Knowing the run command for a particular program can be helpful if Windows isn't working properly but you do have access to a command line interface or if you'd just like to access a particular program more quickly.

2. Click or search for "Run" toolbox.
3. Enter below listed commands into text box.
4. Click on Ok to open specific utility.

Knowing the run command for a particular program can be helpful if Windows isn't working properly but you do have access to a command line interface or if you'd just like to access a particular program more quickly.
List of Run commands
How to run these commands?
1. Open start menu.2. Click or search for "Run" toolbox.
3. Enter below listed commands into text box.
4. Click on Ok to open specific utility.
| Program Name | Run Command |
| About Windows | winver |
| Add a Device | devicepairingwizard |
| Add Hardware Wizard | hdwwiz |
| Advanced User Accounts | netplwiz |
| Authorization Manager | azman |
| Backup and Restore | sdclt |
| Bluetooth File Transfer | fsquirt |
| Calculator | calc |
| Certificates | certmgr |
| Change Computer Performance Settings | systempropertiesperformance |
| Change Data Execution Prevention Settings | systempropertiesdataexecutionprevention |
| Change Printer Settings | printui |
| Character Map | charmap |
| ClearType Tuner | cttune |
| Color Management | colorcpl |
| Command Prompt | cmd |
| Component Services | comexp |
| Component Services | dcomcnfg |
| Computer Management | compmgmt |
| Computer Management | compmgmtlauncher |
| Connect to a Network Projector | netproj |
| Connect to a Projector | displayswitch |
| Control Panel | control |
| Create A Shared Folder Wizard | shrpubw |
| Create a System Repair Disc | recdisc |
| Credential Backup and Restore Wizard | credwiz |
| Data Execution Prevention | systempropertiesdataexecutionprevention |
| Default Location | locationnotifications |
| Device Manager | devmgmt |
| Device Pairing Wizard | devicepairingwizard |
| Diagnostics Troubleshooting Wizard | msdt |
| Digitizer Calibration Tool | tabcal |
| DirectX Diagnostic Tool | dxdiag |
| Disk Cleanup | cleanmgr |
| Disk Defragmenter | dfrgui |
| Disk Management | diskmgmt |
| Display | dpiscaling |
| Display Color Calibration | dccw |
| Display Switch | displayswitch |
| DPAPI Key Migration Wizard | dpapimig |
| Driver Verifier Manager | verifier |
| Ease of Access Center | utilman |
| EFS REKEY Wizard | rekeywiz |
| Encrypting File System Wizard | rekeywiz |
| Event Viewer | eventvwr |
| Fax Cover Page Editor | fxscover |
| File Signature Verification | sigverif |
| Font Viewer | fontview |
| Getting Started | gettingstarted |
| IExpress Wizard | iexpress |
| Import to Windows Contacts | wabmig |
| Install or Uninstall Display Languages | lusrmgr |
| Internet Explorer | iexplore |
| iSCSI Initiator Configuration Tool | iscsicpl |
| iSCSI Initiator Properties | iscsicpl |
| Language Pack Installer | lpksetup |
| Local Group Policy Editor | gpedit |
| Local Security Policy | secpol |
| Local Users and Groups | lusrmgr |
| Location Activity | locationnotifications |
| Magnifier | magnify |
| Malicious Software Removal Tool | mrt |
| Manage Your File Encryption Certificates | rekeywiz |
| Math Input Panel | mip1 |
| Microsoft Management Console | mmc |
| Microsoft Support Diagnostic Tool | msdt |
| NAP Client Configuration | napclcfg |
| Narrator | narrator |
| New Scan Wizard | wiaacmgr |
| Notepad | notepad |
| ODBC Data Source Administrator | odbcad32 |
| ODBC Driver Configuration | odbcconf |
| On-Screen Keyboard | osk |
| Paint | mspaint |
| Performance Monitor | perfmon |
| Performance Options | systempropertiesperformance |
| Phone Dialer | dialer |
| Presentation Settings | presentationsettings |
| Print Management | printmanagement |
| Printer Migration | printbrmui |
| Printer User Interface | printui |
| Private Character Editor | eudcedit |
| Problem Steps Recorder | psr |
| Protected Content Migration | dpapimig |
| Registry Editor | regedit |
| regedt32 | |
| Remote Access Phonebook | rasphone |
| Remote Desktop Connection | mstsc |
| Resource Monitor | resmon |
| perfmon /res | |
| Resultant Set of Policy | rsop |
| Securing the Windows Account Database | syskey |
| Services | services |
| Set Program Access and Computer Defaults | computerdefaults |
| Share Creation Wizard | shrpubw |
| Shared Folders | fsmgmt |
| Snipping Tool | snippingtool |
| Sound Recorder | soundrecorder |
| SQL Server Client Network Utility | cliconfg |
| Sticky Notes | stikynot |
| Stored User Names and Passwords | credwiz |
| Sync Center | mobsync |
| System Configuration | msconfig |
| System Configuration Editor | sysedit |
| System Information | msinfo32 |
| System Properties (Advanced Tab) | systempropertiesadvanced |
| System Properties (Computer Name Tab) | systempropertiescomputername |
| System Properties (Hardware Tab) | systempropertieshardware |
| System Properties (Remote Tab) | systempropertiesremote |
| System Properties (System Protection Tab) | systempropertiesprotection |
| System Restore | rstrui |
| Tablet PC Input Panel | tabtip |
| Task Manager | taskmgr |
| Task Scheduler | taskschd |
| Trusted Platform Module (TPM) Management | tpm |
| User Account Control Settings | useraccountcontrolsettings |
| Utility Manager | utilman |
| Version Reporter Applet | winver |
| Volume Mixer | sndvol |
| Windows Activation Client | slui |
| Windows Anytime Upgrade Results | windowsanytimeupgraderesults |
| Windows Contacts | wab1 |
| Windows Disc Image Burning Tool | isoburn |
| Windows DVD Maker | dvdmaker |
| Windows Easy Transfer | migwiz |
| Windows Explorer | explorer |
| Windows Fax and Scan | wfs |
| Windows Features | optionalfeatures |
| Windows Firewall with Advanced Security | wf |
| Windows Help and Support | winhlp32 |
| Windows Journal | journal |
| Windows Media Player | dvdplay |
| wmplayer | |
| Windows Memory Diagnostic Scheduler | mdsched |
| Windows Mobility Center | mblctr |
| Windows Picture Acquisition Wizard | wiaacmgr |
| Windows PowerShell | powershell |
| Windows PowerShell ISE | powershell_ise |
| Windows Remote Assistance | msra |
| Windows Repair Disc | recdisc |
| Windows Script Host | wscript |
| Windows Update | wuapp |
| Windows Update Standalone Installer | wusa |
| WMI Management | wmimgmt |
| WMI Tester | wbemtest |
| WordPad | write |
| XPS Viewer | xpsrchvw |
Friends of Technology: How to fix a scratched DVD with a banana?
Friends of Technology: How to fix a scratched DVD with a banana?: Did you know you can fix a scratched DVD with a banana? The best home made solution to remove scratches from DVDs! Follow the instruction...
Thursday, 17 July 2014
How to fix a scratched DVD with a banana?
Did you know you can fix a scratched DVD with a banana? The best home
made solution to remove scratches from DVDs! Follow the instructions
posted below.

2. A banana peel
3. Some glass cleaner
2. Using a circular motion, apply a freshly cut banana to it.
3. Wipe it down with the banana peel (the inside). The wax from the peel will help polish and further clean the disk.

4. Take a clean cotton cloth and wipe the entire surface of the CD / DVD. Be sure to apply moderate pressure while moving in a circular motion. This should be done for around 3 to 4 minutes.
5. Finally, spray the disc with glass cleaner and wipe it clean.
Voilà! Your scratched CD or DVD should now look like new! Please note that this trick will also help you repair scratched PS2 and Xbox CD’s and DVD’s.
How to fix a scratched DVD with a banana?
Requirements
1. A banana2. A banana peel
3. Some glass cleaner
How to fix a scratched DVD with a banana?
1. Take a CD / DVD that has smudges and minor scratches on it.2. Using a circular motion, apply a freshly cut banana to it.
3. Wipe it down with the banana peel (the inside). The wax from the peel will help polish and further clean the disk.
4. Take a clean cotton cloth and wipe the entire surface of the CD / DVD. Be sure to apply moderate pressure while moving in a circular motion. This should be done for around 3 to 4 minutes.
5. Finally, spray the disc with glass cleaner and wipe it clean.
Voilà! Your scratched CD or DVD should now look like new! Please note that this trick will also help you repair scratched PS2 and Xbox CD’s and DVD’s.
Follow our main blog at: http://jahsent932.blogspot.com/
Friends of Technology: 4 ways to format write protected pen drives, memor...
Friends of Technology: 4 ways to format write protected pen drives, memor...: Use of flash drives, pen drives are day by day increasing due to it's portability. Many of us may faced an issue of Write Protection....
4 ways to format write protected pen drives, memory cards and flash drives
Use of flash drives, pen drives are day by day increasing due to it's portability. Many of us may faced an issue of Write Protection. One of the solution to get rid from such attack is to scan the drive with antivirus softwares. But there are many other ways are included through which you can remove write protection from drives. Here I have posted the solution with their success rate. Check out them one by one. You surely get success to remove write protection from it.
Solution 1st
- Open Run box (Windows key + R) on your Windows system. Type "regedit" and hit enter. You will get a registry editor.
- Navigate to the registry link:
HKEY_LOCAL_MACHINE\SYSTEM\Currentcontrolset\control\StorateDevicePolicies
- Just right click on "WriteProtect" file and modify the hexadecimal value from 1 to 0.

- Restart your PC.
Note: If you didn't get "StorateDevicePolicies" after control hierarchy, the you need to specify it manually. Do the steps as below:
- Create a new key by right clicking in empty white space in Control folder and by choosing Now -> Key. Give the name as "StorateDevicePolicies".

- Now double-click on the new key (folder) as shown in the pic above and right-click once again and choose New -> DWORD.

- Name it WriteProtect and set its value to 0. Click OK, exit Regedit and reboot your computer.
Solution 2nd
Diskpart is a command prompt functionality which allows to to manage all
the disk drives attached to your computer. Follow the steps as
specified below:
1. Open the command prompt with Administrator privileges. You can do this by simply right clicking on cmd.exe and selecting "Run as admin".
2. Now you need to hit commands as below one by one.
- diskpart
- list disk
- select disk x (x is the number given to flash drive, figure out with the help of your flash drive’s capacity)
- attributes disk clear readonly
- clean
- create partition primary
- format fs=fat32 (you can swap fat32 for ntfs if you only need to use the drive with Windows computers)
- exit
Solution 3rd
Here we are going to deal with Group Policy Object Editor that is
responsible to apply read/write permissions on hard drives and removable
media. Follow the steps as specified below:
1. Open Run box (Windows key + R) on your Windows system. Type "gpedit.msc" and hit enter.
2. Navigate to Computer Configuration -> Administrative Templates -> System -> Removable Storage Access.
2. Navigate to Computer Configuration -> Administrative Templates -> System -> Removable Storage Access.
3. Double click on each entries below and set disable to all of them.
Removable Disks: Deny execute access
Removable Disks: Deny read access
Removable Disks: Deny write access

Removable Disks: Deny execute access
Removable Disks: Deny read access
Removable Disks: Deny write access

Solution 4th
This is working for almost Transcend pen drives. Just follow the steps.1. Download and run the programme JetFlash online recovery.
2. Specify the capacity of your drive eg. 512 MB, 1 GB.
3. Choose "repair and erase all data" OR "repair and keep existing data"
4. Wait until it formats the pen drive.
5. Done.
follow us: http://jahsent932.blogspot.com/
Friends of Technology: Find viruses using Windows netstat feature
Friends of Technology: Find viruses using Windows netstat feature: sometimes people want to know if they are infected by a RAT or something.We must have some alternatives to protect our private data othe...
Find viruses using Windows netstat feature
sometimes people
want to know if they are infected by a RAT or something.We must have
some alternatives to protect our private data other than third party
software.This tutorial may help you to prevent such kinds of threats
from being your system unstable!


2. Check the PID (Process Identifier) checkbox .

3. Now, organize Task Manager by PID by clicking over PID from columns names as shown below. This will make things easier to read for the next step.

4. Open command prompt from start menu. Enter command as "netstat -ano". It will display all the processes which are listening or establishing connection to network.

Only look for ESTABLISHED connections (it would be established if its a RAT or malicious), read the PID and crosscheck into Task Manager. Notice in my example that the only established connections use the PID 424. Lets take a look at what that is:
As we can see, its Firefox. Now lets say you notice the PID reads something like "svchost.exe". You should open the file location by right clicking it and pressing Open File Location and either scan it with Virustotal or check to see if in its legit location (if it was in Appdata or Program Files and it is svchost.exe, then you may have a problem).
Find viruses using Windows netstat feature

Steps you have to perform
1. Open Task Manager (ctrl+alt+del OR ctrl+shift+esc). Go to the processes tab, click View from menu bar & click on Select Columns.3. Now, organize Task Manager by PID by clicking over PID from columns names as shown below. This will make things easier to read for the next step.
4. Open command prompt from start menu. Enter command as "netstat -ano". It will display all the processes which are listening or establishing connection to network.

Only look for ESTABLISHED connections (it would be established if its a RAT or malicious), read the PID and crosscheck into Task Manager. Notice in my example that the only established connections use the PID 424. Lets take a look at what that is:
As we can see, its Firefox. Now lets say you notice the PID reads something like "svchost.exe". You should open the file location by right clicking it and pressing Open File Location and either scan it with Virustotal or check to see if in its legit location (if it was in Appdata or Program Files and it is svchost.exe, then you may have a problem).
Follow the main blog at: http://jahsent932.blogspot.com/
Friends of Technology: How to fix windows 7 genuine warning?
Friends of Technology: How to fix windows 7 genuine warning?: Windows 7 has been known as one of the popular operating system published by Microsoft Windows. Even if Windows 8 is the latest v...
How to fix windows 7 genuine warning?
Windows 7 has been known as one of the popular operating system
published by Microsoft Windows. Even if Windows 8 is the latest version
from Microsoft, lot of users are still using Windows 7 OS. You might be
one of them and even experienced the warning such as ‘This copy of
Windows is not genuine". Today I am here to show you a simple trick
through which you can make Windows 7 genuine without using any software.
You just need an access to administrator privileged command prompt.

You would get the problems such as blank wallpaper with "Not Genuine" warning, Continuously "Not genuine" message prompt, performance degradation of system.
2. Open "Command Prompt" with admin privileges. For that, just right click on CMD and select "Run as administrator".

3. Type the command as "slmgr -rearm" and hit enter.

4. Now Windows Script Host popup will appear which will notify that you have successfully completed that command and you need to restart your system.
Done, You have made your Windows 7 system genuine!
How to make windows 7 genuine?
You would get the problems such as blank wallpaper with "Not Genuine" warning, Continuously "Not genuine" message prompt, performance degradation of system.
Steps you have to perform
1. Click on Start. search for cmd.2. Open "Command Prompt" with admin privileges. For that, just right click on CMD and select "Run as administrator".
3. Type the command as "slmgr -rearm" and hit enter.
4. Now Windows Script Host popup will appear which will notify that you have successfully completed that command and you need to restart your system.
Done, You have made your Windows 7 system genuine!
getting problems? Troubleshoot here!
Microsoft found the vulnerability just as stated above, so they
recovered from this loop hole present in coding with small update
package with name "KB971033" . If your system has already
installed this update package, then you will get an error message while
performing above steps. So you need to uninstall that package from
"Unistall a program" tool and have to try steps again. Also you have to
disallow system to download update package in future, else you will get
the same "Not genuine" warning.follow the main blog at: http://jahsent932.blogspot.com/
Password protect USB drives without using any software
The easiest and convenient way to carry your digital files is to use
pendrives or flash drives. Increasing demands of such types of drives
may also cause some security problems, such as stealing the information
that was not for an unauthorised user. Many of the third party paid
applications are available on internet prompting for securing the data.
But why to bother if you can secure the drive by your own without using
any application. Today, I am here to show you how to password protect
any USB drive without using any application.

2. Click on Start menu.
3. Search for Bitlocker Drive Encryption. Choose first from results.

4. You should find your flash drive in listing. Turn On bitlocker for that specific device.

5. It will ask you for password. Just fill it with desired one. Click next.

6. Save the recovery key to a file if in case you lost your password in future, it will helpful to retrieve drive contents. You can also print and store this file in microsoft account.
 7. Now click on Start Encryption.

It may take some time to complete encryption process depending upon size and speed of data transmission that your pen drive supports. Check whether it's working or not by removing and plugging again into system.
The System will ask you to enter the password to access the data.
Password protect USB drives without using any software
Steps you have to perform
1. Plug in your USB device into machine running with Windows 7 or 8 operating system.2. Click on Start menu.
3. Search for Bitlocker Drive Encryption. Choose first from results.
4. You should find your flash drive in listing. Turn On bitlocker for that specific device.
5. It will ask you for password. Just fill it with desired one. Click next.
6. Save the recovery key to a file if in case you lost your password in future, it will helpful to retrieve drive contents. You can also print and store this file in microsoft account.
It may take some time to complete encryption process depending upon size and speed of data transmission that your pen drive supports. Check whether it's working or not by removing and plugging again into system.
The System will ask you to enter the password to access the data.
Follow the main blog at: http://jahsent932.blogspot.com
Wednesday, 16 July 2014
Friends of Technology: What is Windows 64-bit Itanium ?
Friends of Technology: What is Windows 64-bit Itanium ?: At times, you may have seen on some Microsoft sites or some download sites, download links being available for Windows x86, Windows x6...
What is Windows 64-bit Itanium ?
At
times, you may have seen on some Microsoft sites or some download
sites, download links being available for Windows x86, Windows x64 and Windows x64 Itanium
as well, and wondered what Itanium x64 stood for. Itanium refers to a
processor architecture for Server operating systems, and were also
called were called IA-64, where IA stood for Intel Architecture.

On the other hand, AMD designed the x86-64 processor, which ran both 32-bit software at native hardware speed and offered support to 64-bit memory (AMD64). This is called as x86-64 or now simply as x64. x64 is actually a Microsoft term and stands for Extended 64.
While initially, Microsoft did support the Itanium processor configuration, it later on, dropped Itanium support due to lack of market interest. The main problem with Itanium was that it was not backward compatible, in the sense that it was not able to run x86 software efficiently. It could run only x64 software.

These are the possible values:
follow us at: http://jahsent932.blogspot.com
Windows 64-bit Itanium explained
IA-64 uses the Intel Itanium architecture which is meant for high-performance Enterprise servers and computing systems. It was released in 2001 but its performance was not up to expectations, and it soon sunk like the Titanic – prompting some critics to refer to it as Itanic!On the other hand, AMD designed the x86-64 processor, which ran both 32-bit software at native hardware speed and offered support to 64-bit memory (AMD64). This is called as x86-64 or now simply as x64. x64 is actually a Microsoft term and stands for Extended 64.
While initially, Microsoft did support the Itanium processor configuration, it later on, dropped Itanium support due to lack of market interest. The main problem with Itanium was that it was not backward compatible, in the sense that it was not able to run x86 software efficiently. It could run only x64 software.
Subsequently
Intel too decided to introduce this x64 extension in its own x86-based
processors. The Extended Memory 64 Technology or EM64T allowed
processors like the Intel Xeon processor to permit 32-bit platforms to
access larger amounts of memory supported by 64-bit platforms. It is
this architecture that we are now using, as the 64-bit processor in our
desktops and laptops.
Microsoft Windows XP and Windows Server 2008
R2 were the last versions of Windows operating system to support the
Itanium. Later versions of Windows did not support 64-bit Itanium.
Development of the Itanium versions of Visual Studio and SQL Server were
also discontinued later on.Am I running Windows 64-bit Itanium
Users running older operating systems, can if they wish, find out which systems they are running. To do so, open CMD type the following and hit Enter:wmic cpu get architecture
These are the possible values:
- 0 means x86
- 6 means Itanium
- 9 means x64
follow us at: http://jahsent932.blogspot.com
Recover Memory Card Password of Symbian Phone
Many of us uses password to protect our personal data in removable
devices. But it would be difficult to unlock if we forget the password
of that device, take memory card for instance, If we will forget its
password then it can be a huge problem as our important photos,
documents and other files could face a high risk as if you try to format
or flash the memory card, password will get removed but as well as all
of your important data will also get deleted.
In this article, I will tell you how to unlock or reset the memory card's password in order to gain the access to you important data;

1. Download the application X-Plore from Nokia store and install it in your mobile phone.
Click here to Download for Symbian S60 2nd edition (Nokia: 3230, 6260, 6600, 6620, 6630, 6670, 6680, 6681, 6682, 7610, N70, N72, N90, Panasonic: X700, X800)
Click here to Download for Symbian S60 3rd/5th edition, Symbian ^3 / Anna / Belle (Nokia E-series)
2. After installing, open the X-Plore app and Press 0 (Zero) and select “show the system files”. You will now be able to see your system files in X-Plore application.
3. No navigate to the following path C:/Sys/Data/Mmcstore
4. Once you are there in the Mmcstore folder, you have to press 3 from your keypad to bring a menu full of options in forward from where you can click on Hex-viewer option to move on next step.
5. You will now see several columns and from them, you need to view the third column in which you will see a line of code like TMSD02G (c??"?x???9?4?4?5?5). Note down the numbers present between the ?. This will your memory card password, in my case 94455.
Finally you have recovered your forgotten memory card password, now you can easily enter the password to view your memory card files or alternatively you can reset your memory card password to a more memorable password.
In this article, I will tell you how to unlock or reset the memory card's password in order to gain the access to you important data;
Recover Memory Card Password of Symbian Phone
Steps you have to perform
1. Download the application X-Plore from Nokia store and install it in your mobile phone.
Click here to Download for Symbian S60 2nd edition (Nokia: 3230, 6260, 6600, 6620, 6630, 6670, 6680, 6681, 6682, 7610, N70, N72, N90, Panasonic: X700, X800)
Click here to Download for Symbian S60 3rd/5th edition, Symbian ^3 / Anna / Belle (Nokia E-series)
2. After installing, open the X-Plore app and Press 0 (Zero) and select “show the system files”. You will now be able to see your system files in X-Plore application.
3. No navigate to the following path C:/Sys/Data/Mmcstore
4. Once you are there in the Mmcstore folder, you have to press 3 from your keypad to bring a menu full of options in forward from where you can click on Hex-viewer option to move on next step.
5. You will now see several columns and from them, you need to view the third column in which you will see a line of code like TMSD02G (c??"?x???9?4?4?5?5). Note down the numbers present between the ?. This will your memory card password, in my case 94455.
Finally you have recovered your forgotten memory card password, now you can easily enter the password to view your memory card files or alternatively you can reset your memory card password to a more memorable password.
Follow our main blog at: http://jahsent932.blogspot.com
Friends of Technology: WhatsApp free for 10 years
Friends of Technology: WhatsApp free for 10 years: WhatsApp Messenger is a cross-platform mobile messaging app which allows you to exchange messages without having to pay for SMS. What...
WhatsApp free for 10 years
In addition to basic messaging WhatsApp users can create groups, send each other unlimited images, video and audio media messages.
Whatsapp free for 10 years

Requirements
1. iPhone or iPad2. Android or Nokia Device with Whatsapp application
Steps you have to perform
1. Remove WhatsApp from your phone and take help from your friend who have owned iPhone or iPad.
2. Ask him to register WhatsApp with your number.
3. You will get an verification code on your phone, tell him verification code received on your number and enter it on his iPhone.
3. You will get an verification code on your phone, tell him verification code received on your number and enter it on his iPhone.
4.
After you have done all that steps WhatsApp will start on your friend's
iPhone,just check account info and it will be updated to 2022.
5. Ask your friend to delete it and install the latest version on your phone (Download Here) and check its expiration date.
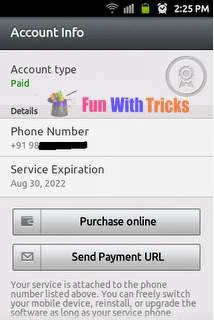
5. Ask your friend to delete it and install the latest version on your phone (Download Here) and check its expiration date.
Subscribe to:
Posts (Atom)